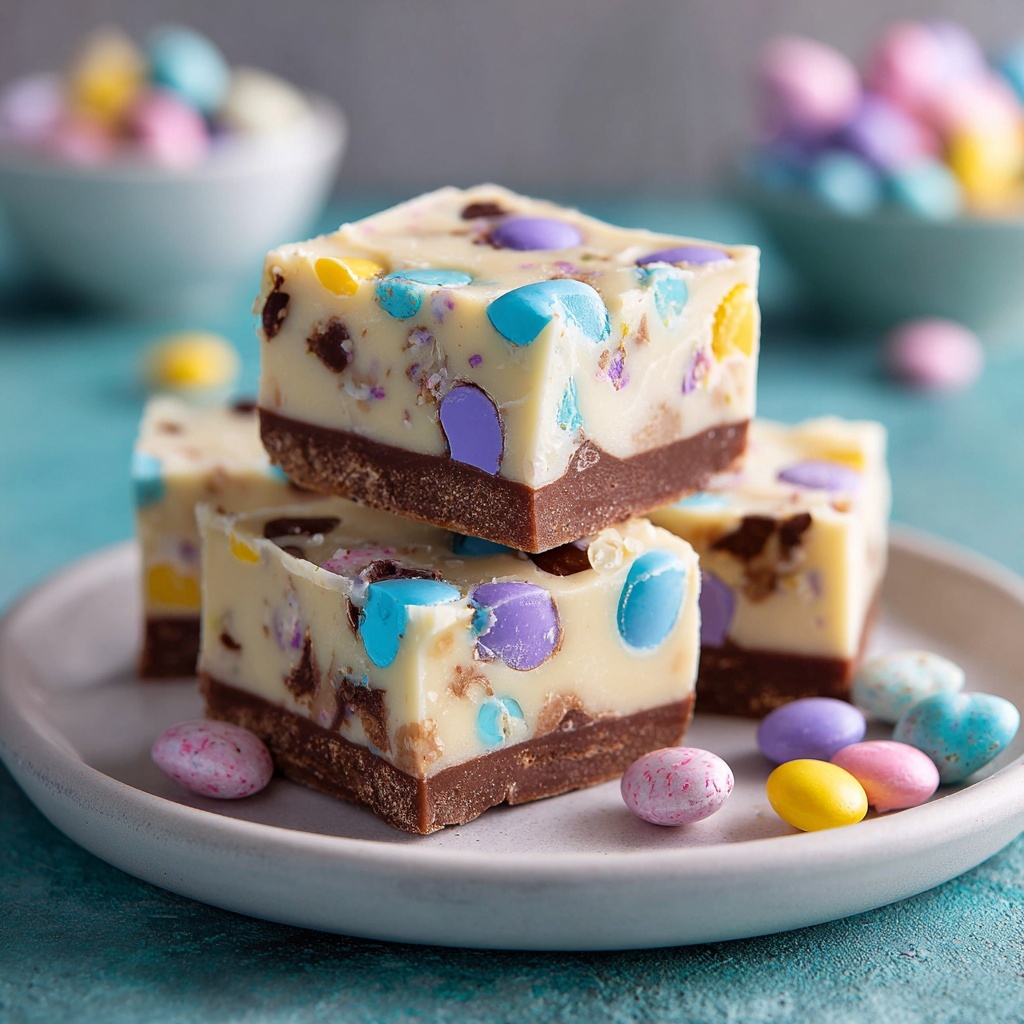
If you’re looking for a sweet, festive treat that captures the joyful spirit of spring, this Easter Candy Fudge Recipe is an absolute must-try. Creamy white chocolate mingles perfectly with a colorful assortment of Easter candies, creating a delightfully smooth fudge that’s as fun to make as it is to eat. It’s wonderfully easy to prepare, no-bake, and packed with those bright, pastel candies that instantly transport you to the heart of the holiday. Whether you’re sharing with family, gifting to friends, or simply indulging yourself, this fudge will quickly become your new seasonal favorite.

Ingredients You’ll Need
This Easter Candy Fudge Recipe relies on a handful of simple, essential ingredients that work in perfect harmony to deliver that creamy texture and festive look. Each component plays a vital role, from the silky white chocolate creating the base, to the sweetened condensed milk enriching the flavor, and of course, the colorful candies that bring charm and crunch.
- White chocolate chips: 3 cups of smooth, creamy chips form the luscious base of the fudge.
- Sweetened condensed milk: 1 (14 oz) can adds sweetness and a velvety texture that blends all elements together.
- Vanilla extract: 1 teaspoon to deepen the flavor with warm, familiar notes.
- Assorted Easter candies: 1½ cups of mini eggs, jelly beans, chopped chocolate eggs, or pastel M&Ms to give each bite festive color and delightful texture.
- Pinch of salt: Balances the sweetness perfectly and enhances all the flavors.
- Pastel sprinkles (optional): For that extra pop of decoration on top, making your fudge even more irresistible.
How to Make Easter Candy Fudge Recipe
Step 1: Prepare your pan
Start by lining an 8×8-inch baking pan with parchment paper. Leave enough overhang on the sides so you can easily lift the fudge out later. This simple step ensures your fudge sets beautifully and removes without a hitch.
Step 2: Melt the base ingredients
In a medium saucepan over low heat, combine the white chocolate chips, sweetened condensed milk, and a pinch of salt. Stir constantly until everything is melted together into one smooth, glossy mixture. This takes just a few minutes, but patience is key to preventing the chocolate from burning or seizing up.
Step 3: Flavor and fold in candy
Remove the saucepan from heat and stir in the vanilla extract to bring out the fudge’s rich flavors. Then gently fold in 1 cup of your chosen assorted Easter candies. This step incorporates delightful bursts of color and sweetness inside your fudge that surprise with every bite.
Step 4: Pour and decorate
Pour the luscious mixture into your prepared pan, spreading it evenly with a spatula. Press the remaining ½ cup of candies into the top of the fudge, and if you like, sprinkle pastel sprinkles over everything to add a whimsical finishing touch.
Step 5: Chill and set
Refrigerate your fudge for at least 2 hours until it’s fully set and firm. Once chilled, lift the fudge out easily with the parchment paper overhang, and slice it into neat squares. These bite-sized pieces are perfect for sharing or hiding in Easter baskets!
How to Serve Easter Candy Fudge Recipe
Garnishes
To make your Easter Candy Fudge Recipe stand out even more, consider adding some playful garnishes like extra pastel sprinkles, edible glitter, or a drizzle of melted pastel-colored candy melts. These simple touches elevate the presentation and add just the right amount of festive flair.
Side Dishes
This fudge shines as a sweet finale to any Easter meal, particularly alongside fresh fruit platters or light lemon desserts that balance its richness. A cup of hot tea or coffee also pairs wonderfully, cutting through the sweetness with warmth and bitterness.
Creative Ways to Present
Wrap squares of the fudge individually in colorful wax paper or place them inside clear cello bags tied with pastel ribbons for beautiful homemade gifts. You can also arrange them on a decorative Easter-themed platter surrounded by fresh flowers or colored shredded paper for a stunning holiday centerpiece.
Make Ahead and Storage
Storing Leftovers
Your Easter Candy Fudge Recipe will keep beautifully in an airtight container in the refrigerator for up to one week. This method preserves freshness, texture, and flavor, so your fudge stays just as delicious as the day you made it.
Freezing
If you want to keep your fudge longer, it freezes well. Wrap pieces tightly in plastic wrap and tuck them into a freezer-safe container. When you’re ready to enjoy, simply thaw in the refrigerator overnight for a perfect treat anytime.
Reheating
Since this fudge is best enjoyed chilled, reheating isn’t typically necessary. However, if the fudge becomes too firm, you can let it sit at room temperature for a few minutes before serving to soften its creamy texture without compromising flavor.
FAQs
Can I use different types of chocolate in the Easter Candy Fudge Recipe?
Absolutely! While white chocolate is traditional and creamy, you can experiment with milk or even dark chocolate chips for a different flavor profile. Keep in mind that this may slightly change the color and sweetness.
What kind of Easter candies work best?
Anything colorful and bite-sized works wonderfully. Mini chocolate eggs, jelly beans, pastel M&Ms, and chopped chocolate eggs add not only sweetness but also a fun variety of textures and colors that make each piece extra special.
Is this recipe difficult for beginners?
Not at all! The Easter Candy Fudge Recipe is beginner-friendly, with no baking involved. It’s a straightforward process of melting, mixing, and chilling that anyone can successfully master.
Can I make this fudge vegan or dairy-free?
This recipe relies on dairy-based white chocolate and sweetened condensed milk, so for vegan or dairy-free versions, you’d need to substitute with plant-based alternatives. Keep in mind texture and taste might differ slightly.
How long does it take for the fudge to set properly?
Allow at least 2 hours in the refrigerator for the fudge to firm up completely. For best results, leaving it overnight helps the flavors meld and the texture become perfectly sliceable.
Final Thoughts
This Easter Candy Fudge Recipe is truly a joyful addition to any spring celebration. Its creamy sweetness, combined with colorful bursts of candy, makes it both a feast for the eyes and the taste buds. I can’t wait for you to try this recipe and share that happiness with everyone around you. Trust me, once you make it, it will become your go-to festive treat year after year!
Print
Easter Candy Fudge Recipe
- Prep Time: 10 minutes
- Cook Time: 5 minutes
- Total Time: 15 minutes (plus 2 hours chilling)
- Yield: 25 pieces
- Category: Dessert
- Method: No-Cook
- Cuisine: American
- Diet: Vegetarian
Description
A festive and easy-to-make Easter Candy Fudge featuring creamy white chocolate and sweetened condensed milk, studded with colorful assorted Easter candies and decorated with pastel sprinkles. Perfect for spring celebrations and a delightful no-bake treat.
Ingredients
Fudge Base
- 3 cups white chocolate chips
- 1 (14 oz) can sweetened condensed milk
- 1 teaspoon vanilla extract
- pinch of salt
Add-ins and Decoration
- 1½ cups assorted Easter candies (such as mini eggs, jelly beans, chopped chocolate eggs, or pastel M&Ms)
- pastel sprinkles for decoration (optional)
Instructions
- Prepare the pan: Line an 8×8-inch baking pan with parchment paper, leaving an overhang on the sides for easy removal of the fudge.
- Melt chocolate and condensed milk: In a medium saucepan over low heat, combine the white chocolate chips, sweetened condensed milk, and a pinch of salt. Stir constantly until the mixture is completely smooth and melted, ensuring no lumps remain.
- Add vanilla and candies: Remove the saucepan from heat and stir in the vanilla extract. Gently fold in 1 cup of the assorted Easter candies to distribute them evenly throughout the fudge mixture.
- Pour and decorate: Pour the fudge mixture into the prepared pan and spread it out evenly with a spatula. Press the remaining ½ cup of Easter candies into the top to create a decorative and colorful surface. Optionally, sprinkle pastel sprinkles on top for added festive decoration.
- Chill to set: Refrigerate the fudge for at least 2 hours or until it is fully set and firm to the touch.
- Cut and serve: Once firm, use the parchment paper overhang to lift the fudge out of the pan. Cut into approximately 25 squares and serve chilled.
Notes
- Use any combination of Easter candy you prefer for a customized flavor and appearance.
- For a more colorful look, add food coloring to the fudge mixture or swirl pastel candy melts on top before chilling.
- Store leftover fudge in an airtight container in the refrigerator for up to one week to maintain freshness.


