
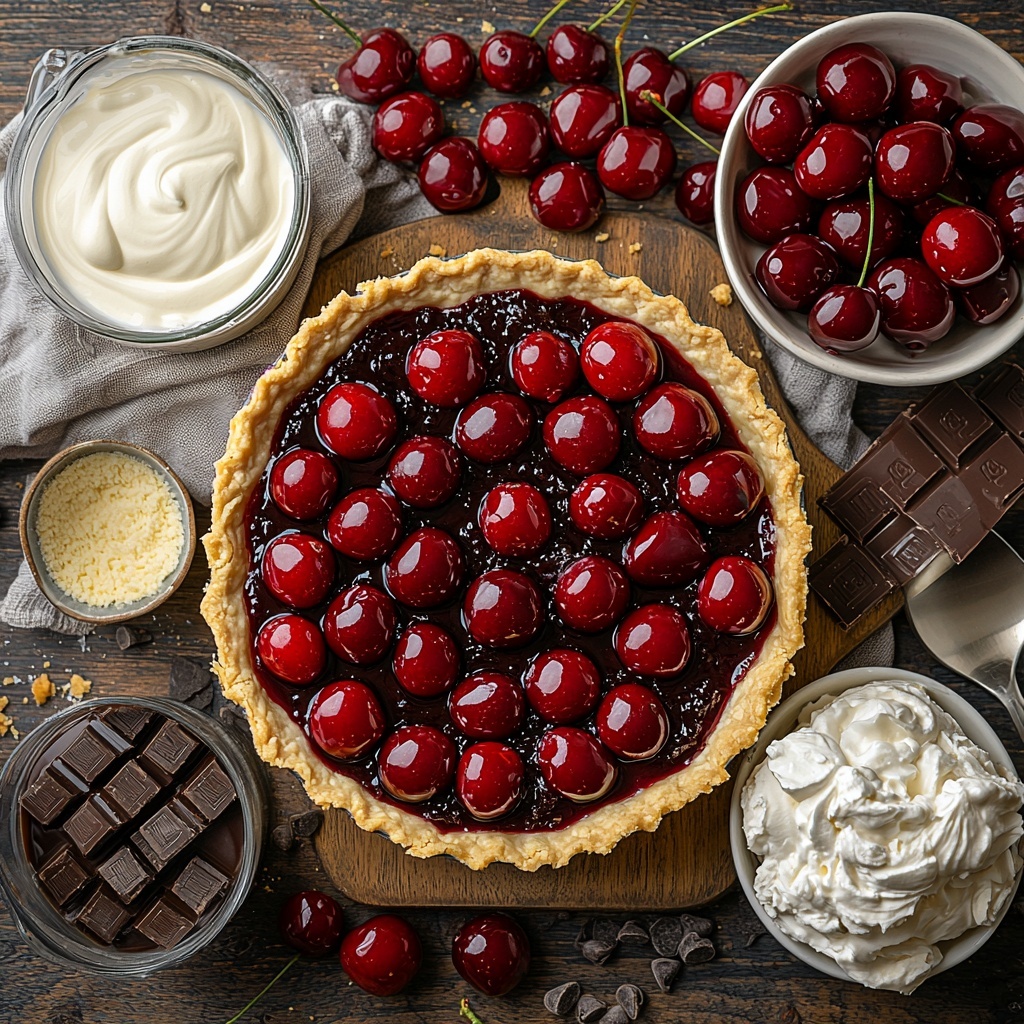
The Indulgent Chocolate Cherry Cream Pie That’s a No-Bake Dream Recipe is a show-stopping dessert that effortlessly combines luscious chocolate, vibrant cherries, and silky cream in a pie that requires no oven time. This delightful treat is perfect for those moments when you want something irresistibly rich yet incredibly simple to prepare. With its layers of cherry sweetness, smooth chocolate mousse, and cool whipped topping all nestled in a buttery pie crust, every bite feels like a celebration. Trust me, once you try this pie, it’ll become your go-to dessert for entertaining or cozy nights in.
Ingredients You’ll Need
Gathering the right ingredients for this pie is both simple and essential to achieving its perfect flavor harmony. Each component plays a special role, from adding creaminess and depth to bringing in bursts of fruity brightness and that classic chocolate charm.
- Cherry Pie Filling: Adds a sweet-tart layer that brightens the pie and contrasts beautifully with chocolate.
- Cream Cheese (softened): Gives a rich, creamy texture and slight tang to balance the sweetness.
- Instant Chocolate Pudding Mix (dark chocolate): Creates the indulgent chocolate mousse layer packed with deep cocoa flavor.
- Cold Whole Milk: Essential for activating the pudding mix and ensuring the mousse is silky smooth.
- Whipped Topping: Provides a light and airy finish that complements the dense layers beneath.
- Mini Chocolate Chips (optional): Offer delightful bursts of chocolate crunch and extra texture.
- Maraschino Cherries: Perfect for garnishing with a pop of color and juicy sweetness.
- 9-inch Pre-Baked Pie Crust: The crisp, buttery foundation that holds all the luscious layers together.
How to Make Indulgent Chocolate Cherry Cream Pie That’s a No-Bake Dream Recipe
Step 1: Prepare the Crust
Start by baking your pie crust until it’s golden and firm — this base is the unsung hero that supports all the delicious layers. Let it cool completely so that the subsequent fillings won’t soften or soak into it, maintaining that perfect crispness.
Step 2: Spread the Cherry Layer
Evenly spoon the cherry pie filling over the cooled crust, gently spreading it to cover the entire surface. This layer is where the pie gets its beautiful pop of red and its burst of tangy sweetness, setting the stage for the chocolate that follows.
Step 3: Mix the Chocolate Mousse
Beat the softened cream cheese until it’s smooth and creamy, making sure there are no lumps. Next, whisk together the instant chocolate pudding mix with cold milk until thick and luscious. Carefully fold the two mixtures together for that signature mousse texture that makes this pie truly indulgent.
Step 4: Layer the Chocolate Mixture
Spoon the velvety chocolate mousse over the cherry layer, then use a spatula to spread it evenly. This layer provides the rich, cocoa-packed center that chocolate lovers dream about, nestled right on top of the fruity cherries.
Step 5: Top with Whipped Cream
Gently spread the whipped topping to cover the mousse layer completely. This light, airy topping balances the dense chocolate and fruit layers below, creating a harmonious melt-in-your-mouth feel with every forkful.
Step 6: Garnish Beautifully
Sprinkle mini chocolate chips over the whipped topping for a hint of crunch and delicate chocolate bursts. Then, artfully arrange maraschino cherries on top to give it that stunning finish that is both classic and inviting.
Step 7: Chill to Set
Pop your masterpiece into the refrigerator and chill for at least three hours to let all those layers meld together perfectly. This chilling time allows the pie to firm up, making it easier to slice and enhancing the flavors with every bite.
Step 8: Serve with Style
When it’s time to dig in, use a hot knife to get smooth, clean slices. Serving this pie cold ensures the creaminess and texture are at their absolute best, delivering every bit of what makes the Indulgent Chocolate Cherry Cream Pie That’s a No-Bake Dream Recipe so irresistible.
How to Serve Indulgent Chocolate Cherry Cream Pie That’s a No-Bake Dream Recipe
Garnishes
Beyond the mini chocolate chips and maraschino cherries, you can add a sprinkle of finely chopped toasted nuts or a dusting of cocoa powder to elevate the visual appeal and add subtle flavor contrasts. Fresh mint leaves also bring a refreshing aroma and beautiful color contrast to this vibrant dessert.
Side Dishes
This pie pairs beautifully with simple accompaniments such as a scoop of vanilla bean ice cream or a dollop of lightly sweetened whipped cream. For an extra indulgent touch, serve alongside freshly brewed coffee or a glass of dessert wine to round out the experience.
Creative Ways to Present
For special occasions, serve individual portions in clear dessert glasses layered with extra cherries and chocolate chips, turning the pie into pretty parfaits. Or create a dessert platter featuring slices of the pie alongside other complementary treats like chocolate-covered strawberries or biscotti for a wow-worthy spread.
Make Ahead and Storage
Storing Leftovers
Keep any leftover pie covered tightly with plastic wrap or in an airtight container in the refrigerator. It will stay fresh and delicious for about three days, making it perfect for enjoying a slice or two after the big event without losing any quality.
Freezing
You can freeze individual slices wrapped snugly in plastic wrap and aluminum foil to protect from freezer burn. When you’re ready, thaw them overnight in the refrigerator for the best texture, though the whipped topping may lose a little of its original fluffiness.
Reheating
This pie is best enjoyed cold, so reheating is generally not recommended. However, if you prefer a slightly softened slice, let it sit at room temperature for about 15-20 minutes before serving to bring out the flavors without compromising texture.
FAQs
Can I make this pie dairy-free or vegan?
Absolutely! Substitute dairy products like cream cheese, milk, and whipped topping with their plant-based alternatives. Just make sure to use a dairy-free chocolate pudding mix or prepare your own vegan chocolate mousse to keep the dessert creamy and delicious.
Is it possible to use fresh cherries instead of canned pie filling?
Yes, fresh cherries can be a fantastic alternative. Just cook them down with a bit of sugar and lemon juice until thickened to mimic the pie filling texture before spreading over the crust.
How long does it take to chill the pie properly?
The Indulgent Chocolate Cherry Cream Pie That’s a No-Bake Dream Recipe requires at least three hours in the fridge to set well. If you have more time, chilling overnight will deepen the flavors and firm up the layers beautifully.
Can I prepare this pie in advance for a party?
Definitely! This recipe is perfect for making a day ahead, which reduces stress on the day of your event. Just garnish before serving for the freshest look and taste.
What’s the best way to get clean slices when serving?
Warm a sharp knife by running it under hot water, then dry it before slicing. This simple trick helps glide through the creamy layers without smudging or crushing the pie.
Final Thoughts
If you’re looking for a dessert that marries rich chocolate, sweet cherries, and creamy textures without turning on the oven, this Indulgent Chocolate Cherry Cream Pie That’s a No-Bake Dream Recipe is your answer. It’s an absolute joy to make, share, and savor. I’m confident it’ll become a beloved favorite in your recipe collection just as it is in mine!
Print
Indulgent Chocolate Cherry Cream Pie That’s a No-Bake Dream Recipe
- Prep Time: 20 minutes
- Cook Time: 10 minutes (for baking pie crust if not pre-baked)
- Total Time: 3 hours 30 minutes (includes chilling time)
- Yield: 8 servings
- Category: Dessert
- Method: No-Cook
- Cuisine: American
Description
This Indulgent Chocolate Cherry Cream Pie is a luscious no-bake dessert combining sweet cherry pie filling with a creamy chocolate mousse and fluffy whipped topping. Perfect for any occasion, it requires minimal effort while delivering rich flavors and beautiful presentation. The combination of tart cherries and smooth chocolate cream in a flaky pre-baked crust makes this pie a delightful treat that impresses guests with its decadent yet effortless preparation.
Ingredients
Cherry Layer
- 1 can Cherry Pie Filling (use canned for convenience)
Chocolate Mousse Layer
- 8 oz Cream Cheese (softened for easy mixing)
- 1 pkg Instant Chocolate Pudding Mix (dark chocolate variety preferred)
- 2 cups Cold Milk (whole milk recommended to activate pudding mix)
Whipped Topping and Garnish
- 8 oz Whipped Topping (store-bought or homemade)
- Mini Chocolate Chips (optional, for added texture)
- Maraschino Cherries (for garnishing the pie)
Pie Base
- 1 9-inch Pre-Baked Pie Crust (your favorite type)
Instructions
- Prepare the Crust: Bake your 9-inch pie crust according to package instructions or your favorite recipe until golden and firm. Allow it to cool completely on a wire rack before assembling the pie.
- Spread the Cherry Layer: Evenly spoon and spread the cherry pie filling over the base of the cooled pie crust, making sure it covers the entire surface for a balanced fruit layer.
- Mix the Chocolate Mousse: Beat the softened cream cheese in a mixing bowl until smooth and creamy. In a separate bowl, whisk together the instant chocolate pudding mix and cold milk until thickened. Fold the pudding mixture into the cream cheese gently until fully combined to create the chocolate mousse.
- Layer the Chocolate Mixture: Spoon the chocolate mousse evenly over the cherry layer in the pie crust. Use a spatula to smooth the surface for an attractive, uniform finish.
- Top with Whipped Cream: Spread the whipped topping evenly over the chocolate mousse layer, creating a smooth and fluffy top layer that adds lightness to the pie.
- Garnish Beautifully: Sprinkle mini chocolate chips over the whipped topping for added texture. Arrange maraschino cherries artfully on top to enhance visual appeal and complement the cherry layer beneath.
- Chill to Set: Place the assembled pie in the refrigerator and chill for at least 3 hours. This resting time allows the layers to set firmly and flavors to meld together.
- Serve with Style: Use a hot knife to carefully slice the pie into servings. Serve the pie cold to enjoy the creamy textures and rich flavors at their best.
Notes
- For best results, ensure the cream cheese is fully softened before mixing to avoid lumps in the mousse.
- Using a pre-baked pie crust saves time and provides a crisp base for the creamy layers.
- The pie must chill for at least 3 hours to properly set; overnight chilling is recommended for optimal texture.
- Mini chocolate chips are optional but add a delightful crunch; substitute with chopped nuts if preferred.
- Use a sharp, warmed knife for clean and neat pie slices.


