
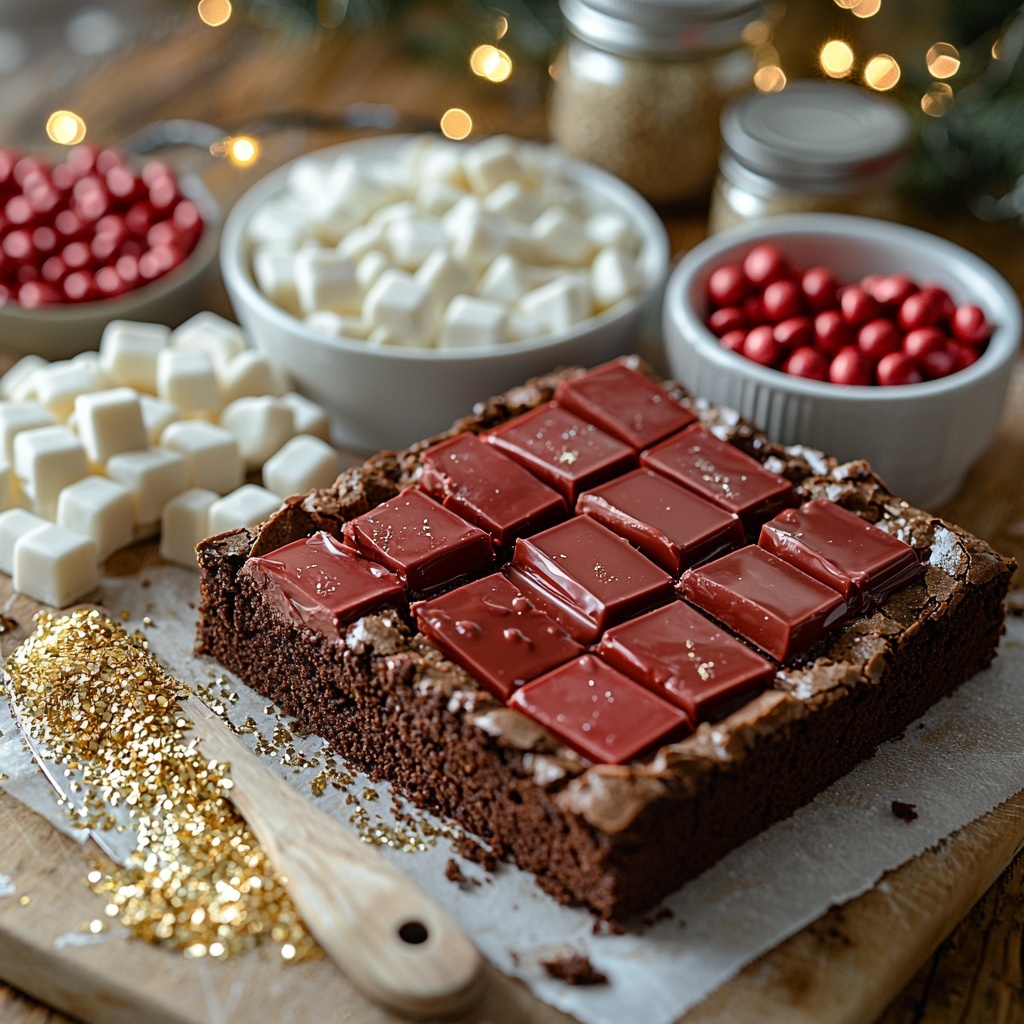
If you’re looking to wow your friends and family with a festive treat that’s as fun to make as it is to eat, the Santa Belly Brownies Recipe is exactly what you need. These rich, fudgy brownies are covered in a glossy, candy-red ganache that makes every bite feel like a celebration. With adorable mini chocolate belt buckles and white chocolate “buttons,” they capture the playful spirit of the holidays perfectly. Whether you’re baking for a party or just want a sweet pick-me-up, this recipe combines simple ingredients and straightforward steps into an irresistible dessert everyone will adore.
Ingredients You’ll Need
The magic of the Santa Belly Brownies Recipe comes from a few carefully chosen ingredients that work beautifully together to create incredible flavor, texture, and eye-catching color. Each component plays a crucial role, from the fudgy brownie base to the silky red topping and festive decorations that bring the whole look together.
- Brownie base: Use your favorite boxed mix or homemade recipe for a rich, chewy foundation with perfect fudginess.
- Red candy melts: These provide that signature bright red hue and smooth finish for the ganache topping.
- Heavy cream: It adds luscious creaminess and helps the ganache set with a glossy shine.
- White chocolate chips or white M&Ms: Perfect for mimicking Santa’s “buttons” with a sweet pop of contrast.
- Mini chocolate squares: These form the classic belt buckle centerpiece on each brownie square.
- Edible gold luster dust or spray: Adds a shimmering, elegant touch to the chocolate buckles, making each treat sparkle.
- Corn syrup or edible glue (optional): Helpful for sticking decorations firmly in place so they look flawless on the plate.
How to Make Santa Belly Brownies Recipe
Step 1: Bake and Cool the Brownie Base
Start by preparing your favorite brownie recipe or a boxed mix, baking it in a 9×13-inch pan lined with parchment paper. This ensures easy removal later. Once baked, allow the brownies to cool completely so your ganache won’t melt the surface when applied. Cooling is key for that clean, professional look.
Step 2: Prepare the Red Candy Ganache
In a microwave-safe bowl, combine the red candy melts and heavy cream. Heat them in 30-second bursts, stirring in between, until the mixture becomes smooth and glossy. This red ganache will coat your brownies beautifully, delivering that festive color and a velvety texture.
Step 3: Spread the Ganache Evenly
Using an offset spatula or the back of a spoon, spread the warm red ganache evenly over the cooled brownies. Then, place the pan in the fridge for 10 to 15 minutes, allowing the ganache to set to a slightly firm but still soft consistency. This makes it easier to cut and decorate.
Step 4: Cut Into Squares
Once the topping is set but not completely hardened, carefully cut the brownies into even squares with a clean, sharp knife. This helps prevent cracking and keeps the edges neat for decorating.
Step 5: Add the Belt Buckles
Brush the mini chocolate squares lightly with edible gold luster dust or spray for that festive shine. Then place one chocolate buckle at the center of each brownie square, instantly transforming your treats into Santa’s iconic belly decorations.
Step 6: Attach the White Chocolate Buttons
Press two to three white chocolate chips or white M&Ms directly above each buckle to mimic the buttons on Santa’s suit. If any of the pieces don’t stick easily, use a dab of corn syrup or edible glue to secure them firmly.
Step 7: Chill and Set
Refrigerate the decorated brownies again for another 10 minutes to allow all the elements to set completely before serving. This final step ensures each Santa Belly Brownie stays perfectly adorned.
How to Serve Santa Belly Brownies Recipe
Garnishes
To enhance the festive look, dust a little powdered sugar over the brownies for a snowy effect or sprinkle finely chopped peppermint candies around the serving platter. These simple garnishes add an extra holiday vibe without overpowering the cheerful charm of your Santa Belly Brownies Recipe.
Side Dishes
These brownies pair beautifully with a scoop of vanilla ice cream or a dollop of whipped cream to balance the rich chocolate flavor. A warm cup of mulled cider or hot cocoa also complements the dessert perfectly, completing a cozy holiday treat experience.
Creative Ways to Present
For gifting or a party buffet, arrange the brownies on a festive, decorative platter or stack them in a clear treat jar tied with a holiday ribbon. You can also serve them in individual cupcake liners to keep them looking neat and to-go friendly for guests.
Make Ahead and Storage
Storing Leftovers
You can keep leftover Santa Belly Brownies Recipe treats fresh by storing them in an airtight container at room temperature for up to 3 days. Make sure to separate the layers with parchment paper to prevent sticking.
Freezing
For longer storage, wrap the brownies tightly in plastic wrap and place them in a freezer-safe bag or container. They freeze well for up to 2 months and thaw quickly at room temperature when you’re ready to enjoy them again.
Reheating
Since these brownies are best served chilled with ganache, avoid reheating. If you prefer a slightly warmed treat, gently microwave a single brownie for about 10 seconds, but watch carefully so the ganache doesn’t melt too much.
FAQs
Can I make Santa Belly Brownies Recipe without candy melts?
Absolutely! You can substitute red candy melts with white chocolate chips mixed with a few drops of red oil-based food coloring for that bright festive color. Just be sure to melt them slowly for a smooth finish.
Do I have to use edible gold dust for the belt buckles?
Edible gold dust adds a lovely sparkle, but it’s optional. You can leave the mini chocolate squares plain if you prefer, or use colored edible glitter to match your holiday theme.
How can I make the brownies easier to cut?
Chilling the brownies after spreading the ganache helps firms everything up for cleaner cuts. Also, use a sharp, warm knife by dipping it in hot water and wiping dry before each cut to reduce sticking and cracking.
Can I prepare these brownies ahead of time for a party?
Definitely! The Santa Belly Brownies Recipe can be made a day or two ahead. Just keep them chilled in an airtight container and decorate them as close to serving time as possible to keep the toppings fresh.
What’s the best way to decorate if I don’t have edible glue?
If you don’t have edible glue, a small dab of corn syrup works great as a natural, safe alternative for sticking decorations in place securely without altering flavor.
Final Thoughts
These Santa Belly Brownies Recipe treats are a joyful way to bring cheer and deliciousness to your holiday table. With their festive colors, charming details, and fudgy sweetness, they’re sure to become a beloved tradition year after year. I can’t wait for you to try them and watch everyone’s faces light up with delight!
Print
Santa Belly Brownies Recipe
- Prep Time: 15 minutes
- Cook Time: 30 minutes
- Total Time: 45 minutes
- Yield: 12 brownies
- Category: Dessert
- Method: Baking
- Cuisine: American
Description
Santa Belly Brownies are festive, fun, and delicious treats perfect for holiday celebrations. These brownies feature a rich red candy melt ganache layered over a classic brownie base, decorated with gold-dusted mini chocolate squares and white chocolate chips or M&Ms, creating an eye-catching Santa-themed dessert that is sure to impress.
Ingredients
Brownie Base
- 1 batch brownies, baked and cooled (9×13-inch pan)
Red Ganache Topping
- 2 cups red candy melts (or 2 cups white chocolate chips + red oil-based food coloring)
- 1/2 cup heavy cream
Decorations
- 1/2 cup white chocolate chips or white M&Ms
- 12 mini chocolate squares
- 1/2 teaspoon edible gold luster dust or edible gold spray
- 1 teaspoon corn syrup or edible glue (optional, for sticking decorations)
Instructions
- Prepare Brownie Base: Prepare your brownie base from a boxed mix or homemade recipe. Bake it in a 9×13-inch pan lined with parchment paper. Allow it to cool completely to ensure the ganache adheres properly.
- Make Red Ganache: Combine the red candy melts with heavy cream in a microwave-safe bowl. Heat in 30-second intervals, stirring between each until the mixture is smooth and glossy.
- Apply Ganache: Spread the red ganache evenly over the cooled brownies using an offset spatula for a smooth finish. Place the brownies in the refrigerator for 10–15 minutes to let the ganache set slightly but remain soft enough for cutting.
- Cut Brownies: Once the ganache has firmed but is still pliable, use a clean, sharp knife to cut the brownies into 12 even squares.
- Prepare Decorations: Brush each mini chocolate square with edible gold luster dust or spray to give them a festive metallic shine. These will form the “buckles” on the Santa belly brownies.
- Decorate Brownies: Place one gold-dusted mini chocolate square in the center of each brownie square. Press 2–3 white chocolate chips or white M&Ms above each buckle. Use corn syrup or edible glue if needed to secure the decorations in place.
- Set Decorated Brownies: Refrigerate the decorated brownies for an additional 10 minutes to fully set the ganache and ensure the decorations adhere firmly before serving.
Notes
- You can use white chocolate chips with red oil-based food coloring as an alternative to red candy melts.
- Ensure brownies are completely cooled before applying the ganache to prevent it from melting.
- If corn syrup or edible glue is not available, a small amount of melted chocolate can be used as an adhesive for decorations.
- Store brownies in an airtight container in the refrigerator to maintain freshness and ganache firmness.
